| Version | Adjustments |
|---|---|
| 1.0 (2020-11-15) | Initial Version |
Motivation
A small Raspberry Pi Zero serves as my MQTT broker in my WiFi. It would be nice if I could use the App Inventor von MIT to develop my own apps for my smartphone that could be used to communicate with this broker. While there are ready MQTT extensions for the App Inventor, they require additional JavaScript or external configuration files. The MQTT client component presented here works completely independently and does not require any external elements. It fully supports the MQTT protocol version 3.1.1 (Exception: Subscribe and Unsubscribe can only specify a single topic, not a list. Such lists can be handled poorly with the App Inventor.).
This version of the MQTT client is based on the Eclipse Paho Java client (class reference for more detailed information). It is not compatible with the previous version, but allows SSL / TLS connections to be used for higher security requirements.
Content
Connecting to the broker (Connect, Disconnect, ConnectionState, ConnectionStateChanged)
Methods for connecting and disconnecting
Event connection state changed
Error when establishing / operating the connection
Subscribe to topics and receive messages (Subscribe, Unsubscribe, MessageReceived)
Download
The ZIP archive UrsAI2PahoMqtt for download. The archive contains the source code, the compiled binary to upload to the App Inventor and a sample application.
Usage
The OASIS standard for the MQTT protocol can be found here: http://docs.oasis-open.org/mqtt/mqtt/v3.1.1/os/mqtt-v3.1.1-os.html. A detailed explanation of the MQTT basics is available at HiveMQ: MQTT Essentials.
Information on the Eclipse Paho Java client. The class reference for more in-depth information.
Before the MQTT client can be connected to an MQTT broker, the connection options must first be set (see section Setting up the client). The connection to the broker is then created using the Connect method (section Connecting to the Broker). The ConnectionStateChanged event reports any change in the connection state. After work has been completed, the connection to the broker can be cleared using the Disconnect method.
With the different variants of the method Publish, messages are sent to the broker (section Send messages).
The Subscribe method can be used to determine to which topics the client wants to receive messages (Subscribe to Topic section). Subscription to the topics can be canceled using the Unsubscribe method. The receipt of a message about the subscribed topic is reported via the PublishedReceived event.
The component also provides error handling tools (section Error).
Explanations of how it works can be found in chapter MQTT: how it works (German, translated by google)
Setting up the client
To connect to a broker, the component needs to know the connection options. The easiest way to do this is via the properties window of the designer.
Connection data
- Broker
- Hostname or IP address of the broker.
- Port
- Portnumber to connect with. The default value is 1883.
- Protocol
- Protocol type. Allowed entries are "TCP", "SSL" and "TLS". Other values are ignored.
Identification
- ClientID
- Optional: Unique client name. If no value is given, a random value is assigned internally (GUID). The client ID of all clients that are connected to a broker at the same time must be unique.
Authentication
- UserName
- Optional: User name for authentication.
- UserPasword
- Optional: Password.
SSL/TLS: Server authentication
The server authentication (with the SSL / TLS protocol) is set using the ClientCertFile and TruststoreFile properties.
| TrustedCertFile | TruststoreFile | Prüfung |
|---|---|---|
| file name | X | With the specified certificate. |
| empty | file name | With the certificates in the trust store. TruststorePassword required if the truststore is secured with a password. |
| empty | empty | With a CA-signed certificate that the server transmits when the connection is established. |
- TrustedCertFile
- Optional: Name of the certificate file.
- TruststoreFile
- Optional: Name of the truststore file.
- TruststorePassword
- Optional: Password to open the trust store.
SSL/TLS: Client authentication
Client authentication (with the SSL / TLS protocol) is set using the ClientCertFile and ClientKeystoreFile properties.
| ClientCertFile | ClientKeystoreFile | Prüfung |
|---|---|---|
| file name | X | With the specified certificate and private key in ClientKeyFile. ClientKeyPassword required if the KeyFile is protected with a password.. |
| empty | file name | With the certificate and private key in the keystore. ClientKeystorePassword required if the keystore is secured with a password. |
| leer | empty | No client authentication. |
The keystore can be in PKCS#12 format (file extension "p12" or "pfx") or in the standard format.
Authentication via a certificate file
- ClientCertFile
- Optional: Name of the certificate file.
- ClientKeyFile
- Optional: Name of the file with the private key. Mandatory if the authentication takes place via a certificate file.
- ClientKeyPassword
- Optional: Password to open the key file.
- ClientPemFormatted
- Optional: The certificate and the key are PEM formatted.
Authentication via a keystore
- ClientKeystoreFile
- Optional: Name of the keystore file. The keystore can be in PKCS#12 format (file extension "p12" or "pfx") or in the standard format.
- ClientKeystrorePassword
- Optional: Password to open the keystore.
Connection control
- ConnectionTimeout
- Sets the connection timeout value. This value, measured in seconds, defines the maximum time interval the client will wait for the network connection to the MQTT server to be established. The default timeout is 30 seconds. A value of 0 disables timeout processing meaning the client will wait until the network connection is made successfully or fails.
- TimeToWait
- Set the maximum time to wait for an action to complete before returning
control to the invoking application. Control is returned when:
- the action completes
- or when the timeout if exceeded
- or when the client is disconnect/shutdown
The default value is -1 which means the action will not timeout. In the event of a timeout the action carries on running in the background until it completes. The timeout is used on methods that block while the action is in progress.
- MaxInflight
- The max inflight limits to how many messages we can send without receiving acknowledgments. The default value is 10. Increase this value in a high traffic environment.
- KeepAlive
- This value, measured in seconds, defines the maximum time interval between messages sent
or received. It enables the client to detect if the server is no longer available, without
having to wait for the TCP/IP timeout. The client will ensure that at least one message
travels across the network within each keep alive period. In the absence of a data-related
message during the time period, the client sends a very small "ping" message, which the server
will acknowledge. A value of 0 disables keepalive processing in the client.
The default value is 60 seconds
Connecting to the Broker (Connect, Disconnect, ConnectionState, ConnectionStateChanged)
The connection to the broker is made using the Connect method and terminated using the Disconnect method. External events can affect the connection to the broker too, e.g. loss of connection to the network. The current connection state can be retrieved via the ConnectionState property. If the state of the connection changes, the ConnectionStateChanged event is raised.
Methods for connection establishment and termination
The method Connect is available in two variants, without (Connect) and with "Last Will" (ConnectWithLastWill).
 |
Establishes a connection without specifying a "last will". boolean CleanSession indicates whether to link to a previously aborted session. |
 |
Establishes a connection with an indication of a "last will". boolean CleanSession indicates whether to link to a previously aborted session. WillTopic, WillQoS, WillRetain and WillMessage are the same as described in the Publish method (see Sending Messages). |
The planned termination of the connection is done via the method Disconnect. The method has no other parameters.
 |
Note: The information deposited with 'Last Will' only comes into effect if the connection was interrupted irregularly. If the connection is connected by Disconnect, the last will is discarded. Here, the client is responsible for sending appropriate messages before calling Disconnect. |
Connection states
The current connection state can be queried at any time via the ConnectionState property.
 |
int ConnectionState: see the following table. |
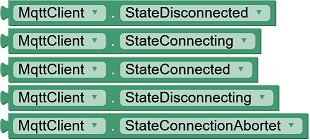
Possible states are:
| Code | State | Meaning | Allowed methods |
|---|---|---|---|
| 0 | Disconnected | The client is not connected to a broker. | Connect |
| 1 | Connecting | The client tries to connect to the broker. | - |
| 2 | Connected | The client is connected to a broker. | Subscribe, Publish, Disconnect |
| 3 | Disconnecting | The client is disconnecting from the broker. | - |
| 4 | ConnectionAborted | The connection could not be established due to an error or was interrupted. Cause of error can be retrieved via the property LastErrorCode and LastErrorMessage. | Connect |
The constants are available as properties:
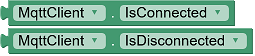
To simplify the state query, the IsConnected and IsDisconnected properties have been implemented:
The following state diagram explains the process of connection establishment and termination:

The MQTT client starts in the Disconnected (0) state. When the Connect method is called, it enters the state Connecting (1). An attempt is made to establish a TCP connection to the MQTT broker and to send a MQTT message of type CONNECT to the broker. If this does not succeed (Error) or if no message of the CONNACK type is received by the broker, the client enters the state ConnectionAborted (4).
When a message of type CONNACK is received, it is verified that the broker accepts the connection request from the client. If this is not the case (CONNACK Error), the network connection is terminated and the client enters the state ConnectionAborted (4). If the broker accepts the connection (CONNACK ok), the client enters the state Connected (2).
Disconnection begins when the Disconnect method is called. The client enters the state Diconnecting (3). First, a DISCONNECT message is sent to the broker. If this succeeds the client goes into the state Diconnected (0). In the event of an error (Error), the state changes to ConnectionAborted (4).
If an error occurs during operation (ReceiverTreadError), the network connection is disconnected and the state changes to ConnectionAborted (4).
Event connection state changed
If the connection state changes, the ConnectionStateChanged event is triggered.
 |
NewState: Numerical value of the state (0..4, see
above) StateString: Name of the state ("Disconnected", etc) |
Error when establishing / operating the connection
Before an attempt is made to establish a connection, it is first checked whether the state of the client allows this (state = Disconnected or ConnectionAborted). If this is not the case, the attempt is aborted and the event ErrorOccurred with code 32300 ("Invalid State.") is triggered.
If the state is permissible, the client changes to the Connecting state. All other errors now lead to the triggering of the ConnectionStateChanged event with the ConnectionAborted state. See the error handling section for more details.
Subscribe to topics and receive messages (Subscribe, Unsubscribe, PublishedReceived)
Subscribe to Topics
Subscribing to news topics is done through the method Subscribe.
 |
String Topic: Topic to subscribe. Wildcards are allowed. int QoS: Desired service level with which these messages are to be received. |
Unsubscribe
Unsubscribing is done using the method Unsubscribe.
 |
String Topic: Subscribtion to be canceled. Wildcards
are allowed. |
Receiving Messages
Received messages trigger the MessageReceived event:
 |
String Topic: Topic of this message. String Payload: Message content in binary format (see below) String Message: Message as String boolean RetainFlag: Indicates whether this is a retained message. boolean DupFlag: Indicates whether it is a repeated delivery. |
Message contents of MQTT messages are byte fields. These byte fields are provided as a string encoded via the Payload parameter. The coding procedure is described in the section Binary data. However, most of the messages is text in "UTF-8" format. Therefore, an attempt is made to convert the byte field to text. If this succeeds, the text is available under the parameter Message. Otherwise, Message contains an empty string.
Sending Messages (Publish)
There are three methods for sending messages.
 |
Default publishing method
Topic: Topic of this message. Message: Message as a string. RetainFlag: Indicates whether the message is a retained message. QoS: Service level for this publishing. |
|
 |
Simplified publishing Topic: Topic of this message. Message: Message as a string. RetainFlag is internally set to false. QoS is 0. |
|
 |
Publishing binary messages Topic: Topic of this message. BinaryMessage: Binary values encoded as a string. RetainFlag: Indicates whether the message is a retained message. QoS: Service level for this publishing. |
Binary data
App Inventor has no byte fields. Byte fields are rarely needed. In this component, binary data is encoded via a string. This is a string of encoded bytes separated by a comma (',') or semicolon (';').
Each bytes could be coded like “0xff” or “0xFF” or “0Xff” or “0XFF” or “#ff” or “#FF” for HEX input or “255” for decimal input or “0377” for octal input.
You can mix it if you want: “0xFF;255,#ff” is valid.
You can insert blanks before and after the number: “ 0xFF ; 255, #ff” is valid too.
A trailing comma or semicolon will be ignored: “0xFF;255,#ff” and “0xFF;255,#ff;” are identical
Upon receiving data, the received packet is translated into a semicolon separated string of decimal numbers, e.g. "123; 33; 0; 44". In the AI2 app you can use String.Split to get a list of bytes.
For the consversion I use this algorithm:
1) replace all commas by semicolons
2) split the
string by semicolons
3) delete leading and trailing blanks
4) convert to integer with
Integer.decode ()
5) check for values < 0 or > 255.
Binary data II - Byte-Array
For another project it was necessary to send and receive fields of type byte[] (byte array). App Inventor cannot handle byte arrays directly, but they can be exchanged as variables of the general type Object between extensions. For my WebCam project, JPEG images could be taken and sent via MQTT. The Android Camera API delivers the JPEG data as a byte array. The blocks PublishByteArray, SubscribeByteArray and PublishedByteArrayReceived are available for handling byte arrays.
PublishByteArray

This block corresponds to the PublishEx method. Instead of the Message parameter there is the ByteArray parameter. Here the output of another extension is connected, which supplies a byte array. Standard blocks in the App Inventor are not able to create byte arrays.
SubscribeByteArray

This block corresponds to the Subscribe method. All received messages that match the specified topic are interpreted as a byte array and forwarded to the PublishedByteArrayReceived event. Wildcards for the Topic parameter are allowed. When choosing topics and subscriptions, you have to be careful that the incoming messages are sorted correctly. The MQTT client checks in the order of byte array subscriptions whether a byte array has been subscribed under the transmitted topic. As soon as a hit is scored, PublishedByteArrayReceived is called. PublishedReceived is only triggered if no hit is scored here.
The comparison is based on the following algorithm https://github.com/iosphere/mosquitto, source: lib/util_mosq.c, method: mosquitto_topic_matches_sub.
PublishedByteArrayReceived

This event is triggered when the topic of the received message (see SubscribeByteArray) detects that a byte array has been received. The ByteArray variable can be passed to an extension that can process byte arrays. Direct use by App Inventor standard blocks is not possible.
Other Methods
IsNull

With this function you can test whether a pointer points to an object.
ToDictionary / FromDictionary

These functions make it easier to manage connection data. ToDictionary creates a Dictionary with all properties of the object with the following keys: Broker, Port, ConnectionTimeout, TimeToWait, KeepAlive, ClientID, UserName, UserPassword, Protocol, MaxInflight, TrustedCertFile, TruststoreFile, TruststorePassword, ClientCertFile, ClientKeyFile, ClientKeyPassword, ClientPemFormatted, ClientKeystoreFile, ClientKeystorePassword.
FromDictionary allows the properties of an MQTT client object to be loaded with the data from a Dictionary. All of the keys specified above must always be available in the Dictionary.
Error Handling
The following properties are available for handling error cases:
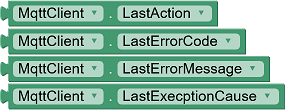 |
LastAction: Name of the last executed action, e.g. "Connect" LastErrorCode: error code of the last error (see below.) LastErrorMessage: textual description of the error, e.g. "Unacceptable protocol version" LastExceptionCause: Text of the exception that triggered the error. |
Important note: The properties mentioned contain only indications of probable error events. Many actions are executed asynchronously. For these the error tracking is not always possible properly. 1..32203 sind Fehlernummern des Paho-Clients.
| Code | Meaning | Text |
|---|---|---|
| 0 | ||
| 1 | The protocol version requested is not supported by the server. | Invalid protocol version. |
| 2 | The server has rejected the supplied client ID. | Invalid client ID. |
| 3 | The broker was not available to handle the request. | Broker unavailable. |
| 4 | Authentication with the server has failed, due to a bad user name or password. | Bad user name or password. |
| 5 | Not authorized to perform the requested operation. | Not authorized to connect. |
| 6 | An unexpected error has occurred. | Unexpected error. |
| 128 | Error from subscribe - returned from the server. | Error from subscribe. |
| 32000 | Client timed out while waiting for a response from the server. The server is no longer responding to keep-alive messages. | Timed out waiting for a response. |
| 32001 | Internal error, caused by no new message IDs being available. | No new message ID available |
| 32002 | Client timed out while waiting to write messages to the server. | Timed out at writing. |
| 32100 | The client is already connected. | Already connected. |
| 32101 | The client is already disconnected. | Already disconnected. |
| 32102 | The client is currently disconnecting and cannot accept any new work. This can occur when waiting on a token, and then disconnecting the client. |
Currently disconnecting. |
| 32103 | Unable to connect to server. | Unable to connect to server. |
| 32104 | The client is not connected to the server. The Connect... method must be called first. It is also possible that the connection was lost. | Not connected. |
| 32105 | Server URI and supplied SocketFactory do not match. URIs beginning "tcp://" must use a javax.net.SocketFactory, and URIs beginning "ssl://" must use a javax.net.ssl.SSLSocketFactory. This error cannot occur due to the implementation of the wrapper. |
URI and SocketFactory do not match. |
| 32106 | SSL configuration error. | SSL configuration error. |
| 32107 | Disconnect called within the
MessageReceived event. This method is called by the client thread and must not be used to control disconnection. |
Disconnecting not allowed. |
| 32108 | Protocol error: the message was not recognized as a valid MQTT packet. Possible reasons for this include connecting to a non-MQTT server, or connecting to an SSL server port when the client isn't using SSL. |
Unrecognized packet. |
| 32109 | The client has been unexpectedly disconnected from the server. | Connection lost. |
| 32110 | A connect operation in already in progress, only one connect can happen at a time. This error cannot occur due to the implementation of the wrapper. |
A connect already in progress. |
| 32111 | The client is closed - no operations are permitted on the client in this state. This error cannot occur due to the implementation of the wrapper. |
The client is closed. |
| 32201 | A request has been made to use a token that is already associated with another action. This error cannot occur due to the implementation of the wrapper. |
Token already in use. |
| 32202 | A request has been made to send a message but the maximum number of inflight messages has already been reached. | Too many publishes in progress. |
| 32300 | The current state does not allow the desired action. Connection establishment: The state must be Disconnected (Code 0) or ConnectionAborted (Code 4). Sending (Subscribe, Unsubscribe, Publish...): The state must be Connected (Code 2). |
Invalid State. |
| 32301 | The specified topic is empty. With ConnectWithLastWill, Subscribe, Unsubscribe, Publish... the specification of a topic is mandatory. |
Empty topic. |
| 32302 | PublishBinary method: The specified string cannot be
converted into binary format. See instructions in the Binary Data section. |
Invalid binary code. |
| 32303 | PublishByteArray method: The ByteArray argument is not of the byte array type (byte[ ]). | Not a byte array. |
| 32304 | Connect... method: Invalid connection data. | Invalid connection parameters. |
| 32305 | FromDictionary method: The specified Dictionary does not contain all required fields. | Invalid dictionary content. |
| 32306 | Connect... method: The file specified for TruststoreFile cannot be loaded. | Cannot load truststore file. |
| 32307 | Connect... method: The file specified for TrustedCertFile cannot be loaded. | Cannot load trusted certificate file. |
| 32308 | Connect... method: The file specified for ClientCertFile oder ClientKeyFile cannot be loaded. | Cannot load client certificate file or key file. |
| 32309 | Connect... method: The file specified for ClientKeystoreFile cannot be loaded. | Cannot load client keystore file. |
Example
SSL / TLC Test
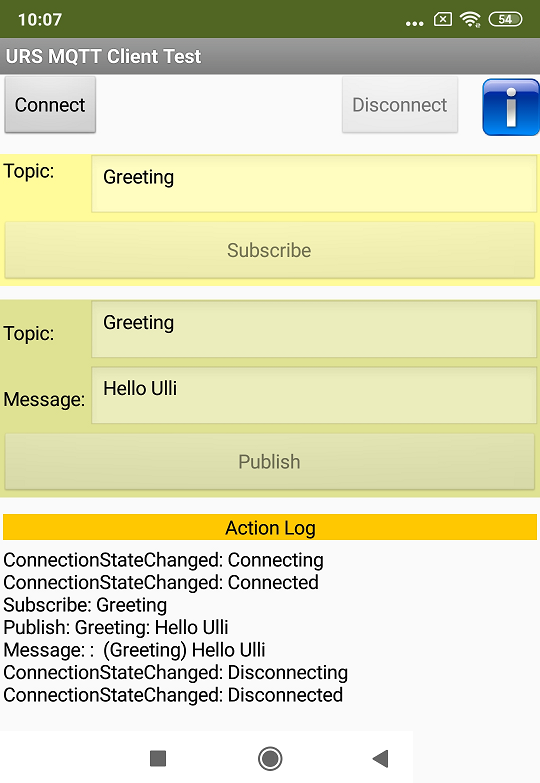
This little app connects to Mosquitto-Test-Broker. It allows you to subscribe to and send messages.
Kitchenlight
The example includes two apps that communicate with each other via MQTT. The first app, MQTTKitchenLight, emulates a simple lamp. A switch can be used to switch the lamp on and off.
This lamp connects to an MQTT broker and, when connected, publishes the current state (on, off, offline). In addition, the lamp can receive commands via MQTT (toggle) and respond accordingly.
The second app, MQTTKitchenLightControl, receives the state messages of the first app via MQTT and displays them. By clicking the switch button toggle commands are sent to the first app.
MQTTKitchenLightControl has a Screen named "Settings" with which you can set the connection data. With MQTTKitchenLight, there is no "Settings" screen implemented, the user name and password must be specified via the designer properties when creating the app. When entering the data you have to pay attention to the auto-completion of Android. It likes to insert additional characters, including spaces.
App MQTTKitchenLight
The following two pictures show screenshots of the app in two different states with explanation of the screen elements.
 |

|
Functionality
MQTTKitchenLight, the emulated lamp, starts with the lamp state off. If the "On / Off" button is pressed, the state changes to on and the next time it is pressed back again to off. The app sends its current state, "on" or "off", each time the lamp state changes with topic "home/kitchen/light/state" to the MQTT broker. The message is sent with a set retain flag, so that later added controllers immediately receive the current state when they log on to the broker.
The controller also needs to know if the app, i.e. the lamp, is online. Therefore, the app sends the message "offline" before disconnecting under the same topic. In order to ensure this even in the case of an unforeseen disconnection, a corresponding "Last Will" will be set up when connecting to the server
The app subscribes to the topic "home/kitchen/light/cmd". If it receives a message under this topic, the lamp is state is toggled. The message content should be "toggle", but this will not be evaluated.
App MQTTKitchenLightControl
 |

|

|

|
Functionality
The app has three states for the lamp: unknown (offline), on (on) and off (off). In the unconnected state, the state is basically unknown. After connecting with the broker, the app receives state information from the server (topic "home/kitchen/light/state"). The app MQTTKitchenLight publishes the current state of the lamp as a message with set retain flag, or the state offline, if the connection is disconnected or interrupted (Last Will). The app displays the lamp state accordingly.
In the connected state (app connected and current state on or off) the button "On/Off" is activated. If pressed, the app sends the message "toggle" to the broker with the topic "home/kitchen/light/cmd". If the MQTTKitchenLight app receives this message, it will toggle the lamp state and send a message with the new state.
The app has an additional dialog with which the connection options could be set.
The system can run any number of MQTTKitchenLightControl apps and control a single MQTTKitchenLight app. If you want to control several apps of type MQTTKitchenLight, you have to make the topics configurable.
Building the Extension
Modifications of Eclipse Paho Client
Unfortunately, the original Eclipse Paho Java Client Version 1.2.5 cannot be used directly. The logging mechanism uses methods that are not available in the App Inventor environment. In addition, the loading of the network modules does not work.
The UrsDummyComponent class was added so that the required files are created in the subsequent build.
Logging
The UrsLogger class has been added to the org.eclipse.paho.client.mqttv3.logging package. This implements the Logger interface, but with empty methods. The getLogger methods of the LoggerFactory class have been modified so that they return an object of the UrsLogger class.
The logging mechanism of the Paho client is then deactivated. If the internal logging is to be activated again, the empty methods of the UrsLogger class must be mapped to the Android Log class.
Network modules
In the Paho Client, the network modules are dynamically recognized and loaded based on their class (derived from NetworkModuleFactory). The existing modules were therefore entered as a static list in the NetworkModuleService class.
Build process
When specifying the directory in the following sections, <user> must always be replaced by the appropriate name!
Create .jar library
Um eine Bibliothek zu erstellen, die später in die Extension eingebunden werden kann, kann wie folgt vorgegangen werden. Die Methode basiert auf einer Installation der Entwicklungsumgebung wie sie im unter AI2 FAQ: Extensions entwickeln beschrieben wurde.
To create a library that can later be integrated into the extension, you can proceed as follows. The method is based on an installation of the development environment as described in AI2 FAQ: Developing Extensions.
First, the sources are copied into the directory C:\Users\<user>\ appinventor-sources\appinventor\components\src.
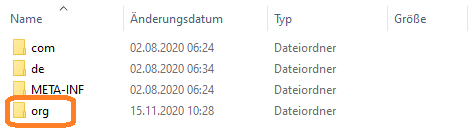
In addition to the com directory for the AI2 sources and de for my extensions, there is now the org directory with the Paho sources. If you compile as usual ("ant extensions" in the "Git Bash" window), the.jar library
C:\Users\<user>\appinventor-sources\appinventor\components\build\externalComponents-class\org.eclipse.paho.client.mqttv3.jar
This file is renamed to ursmod-paho-1.2.5.jar and copied into the folder
C:/Users/<user>/appinventor-sources/appinventor/components/src/de/ullisroboterseite/ursai2pahomqtt.
This is the source folder for the extension.
Modifications of build.xml
The following entry in the CopyComponentLibraries In section must be added to file
C:/Users/<user>/appinventor-sources/appinventor/components/build.xml
(one line!):
<copy toFile="${public.deps.dir}/paho.jar" file="C:/Users/<user>/appinventor-sources/appinventor/components/src/de/ullisroboterseite/ursai2pahomqtt/ursmod-paho-1.2.5.jar " />
This means that when the extension is created, the library is copied from the source directory into the intended folder and can be integrated.
The sources for the Paho Client can be removed now.
Modifications of source code
The component receives the additional annotation
@UsesLibraries(libraries = "paho.jar")
Tools
For developing own extensions I gathered some tips: AI2 FAQ: Develop Extensions.