| Version | Adjustment |
|---|---|
| 1 (2018-01-27) | Initial version |
| 2 (2018-12-08) | Since December 2018 there had been problems with network accesses. These accesses must now be executed in
a separate thread. The extension had been rewritten accordingly. In addition, the property InitErr was introduced, which can be used to retrieve errors during initialization of the component. |
| 3 (2019-01-11) | Unfortunately, version 2 had a few problems. Version 3 is restructured. Unfortunately, it is not
compatible with the previous version. For this reason, please observe the migration instructions
listed below for updating existing App Inventor projects. The old version 2 is archived here. |
| 3.1 (2019-04-29) | The new property BinaryMode allows the transfer of binary data. This version is compatible with version 3.0. When uploading the existing links of the blocks are retained. |
| 3.2 (2020-02-17) | - DropSentToYourself was not forwarded after the start of the listener. - Determining the local host IP by enumeration via the network interfaces leads to problems with devices that have more than one interface. DropSentToYourself did not work. DropSentToYourself now compares the sender address with all existing NIC addresses. LocalHost is now the address with which the Internet is reached (google.com, 8.8.8.8). |
| 4.0 (2020-07-15) | The existing version was extremely "buggy". It was one of the first extensions I wrote. I have therefore completely redesigned the project. The advantage: the bugs are out and there are advanced methods that simplify the construction of the blocks in App Inventor. The disadvantage is that the version is not compatible with the old one. |
| 4.1 (2021-01-15) | Fixed bug with DropSentToYourself. |
| 4.2 (2021-03-30) | - Fixed problem when using the same port number when sending and receiving. - Fixed crash of the listener in the Companion after "Refresh Companion Screen". |
| 4.3 (2021-04-09) | Sending and receiving of a ByteArray added. |
| 4.4 (2022-03-31) | Multicast option added. |
| 4.5 (2025-04-20) | Recompiled with new version of the UrsAI2ByteArray extension. No functional changes. |
Motivation
For a project, an Android app should be developed that communicates with an ESP8266 (project). For easy development of the app MIT App Inventor 2 was chosen.
The IP addresses of the available ESP8266 devices should not be fixed in the project. The app should itself determine which devices are currently active and which are the addresses they can be addressed from.
To accomplish this task (name service), you can use the broadcast function of UDP. You simply send a broadcast datagram to a previously agreed port to all devices on the local network, requesting their connection data. The devices that are listening on the agreed port then return their IP and possibly further data to the sender. The sender collects the answers and thus knows all active devices. Because UDP packet delivery is not guaranteed, it's a good idea to repeat this process and use the union set of responses.
In order to be able to address the devices of a project in a targeted manner, you either agree on different ports or you enter a device identifier in the response. The receiver then filters out those devices it is interested in.
The problem is: App Inventor has no built-in UDP and I have found no working extension. So do it yourself.
Notice:
The extension works perfectly if the smartphone and the remote station are in the same (local) network. If the smartphone is only connected via a cellular network, it is usually not reachable. The reason is that the smartphone is not directly connected to the Internet, but only to the local network of the mobile phone provider.

A device in your own LAN can be reached from outside via port forwarding on your own router (if necessary via DDNS). You won't be able to influence the provider's router. So sending from the smartphone to a device in the LAN works, the other way around is not possible.
The same also applies to TCP. If the smartphone is only connected to the cellular network, the connection can only be established from the smartphone. The device in the LAN must act as a server, it waits for an incoming connection request. The smartphone acts as a client, i.e. it initiates the connection. Once the connection has been set up, the routers have coordinated internally of addresses and ports. The data transfer is then possible in both directions.
Notice:
On UNIX systems, port numbers up to 1023 (inclusive) are reserved for the system. These restrictions have been retained for LINUX and therefore also for Android. Root authorizations are required to use these port numbers. The same applies to Apple's iOS.
This extension can therefore not be operated with port numbers below 1024.
Important hint:
Some devices that are controlled via UDP respond to the sender with. The use as destination address that address from wich the packet was received. So that this packet can be received, the sending and receiving addresses of the app must be the same. The parameter LocalPort (= port on which the data is sent) must not keep the default setting 0, but must be set accordingly.
Content
Transmitting Datagrams
Sending an receiving text (URSAI2UDPTest)
Download
The ZIP archive UrsAI2UDP for download. The archive contains the source code, the compiled binary to upload to App Inventor and a sample application.
Usage
The extension contains two components. If it is imported into an App Inventor project, two entries appear under the "Extension" heading.
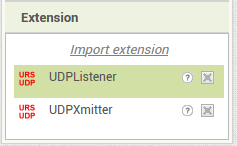
UDPListener is a component that listens to incoming datagrams and makes them available to the project. UDPXmitter is used to send datagrams.
Some more detailed information about UDP can be found on my page .NET UdpClient: Aufs Bit geschaut. In particular, the sections on addressing schemes and the Java interface are also relevant for Android.
In technical applications or when controlling devices, it is often necessary to work with binary data. With version 4.3, the sending and receiving of binary data has been significantly simplified via the UrsAI2ByteArray extension (see also example UDPBinaryTest).
Transmitting Datagrams
Four different methods have been implemented for sending datagrams. They should reduce the size and number of the necessary program blocks in App Inventor. Many and large blocks quickly make an AI2 project confusing.
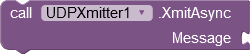
The destination address is often the same. For these cases, the target address data (RemoteHost, RemotePort) can be stored in designer properties. Xmit and XmitAsync send to the addresses stored in the designer. This keeps the blocks small. Practically only one "line" is necessary.

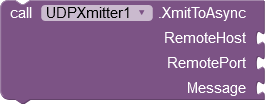
XmitTo and XmitToAsync allow the destination address to be specified independently.
The methods also differ in the type of error handling. Those with the ending "... Async" acknowledge the sending of a message with the events AfterXmit and XmitFailure. AfterXmit is triggered after every transfer. If you are only interested in error situations, use the XmitFailure event , which is additionally triggered in case of an error. The other two methods return the error codes as return values.
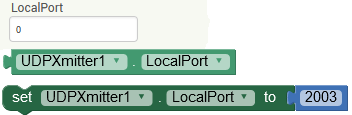
It is usually not necessary to specify the local port from which datagrams are to be sent. Should this be necessary in special cases, the local port number (LocalPort) can be defined in the designer. If the value is "0" (the default value), the system looks for a free port for sending internally.
Of course, all designer properties can be overwritten per block.
Properties / Parameters
Three details are required to send a message: destination address, sender address and the message itself. Network addresses consist of two components: IP (address) and port (number). The port is usually connected to a certain service (see also Wikipedia: List of TCP and UDP port numbers).
This extension only takes IPv4 addresses into account. This address is a combination of four numbers, each in the range 0..255. A complete network address is given as "IP: Port ", e.g. "192.168.178.35:2003" .
Some addresses have special meanings. For UDP address schemes, see UdpClient: Aufs Bit geschaut / Adressierungsschemata. To endpoints in Java look at UdpClient: Aufs Bit geschaut / Java.
The devices that communicate with each other on the network are called "endpoints" or "hosts" (it is not exactly the same, but the terms are often used equally). So the sender is named "local host " and the recipient called " remote host".
Sender address
As a rule, there is no need to worry about the sender address. If you do not make any entries, the extension uses the address "0.0.0.0:0". This address means that the system (more precisely the "service provider", i.e. the network firmware) can choose a network interface with which it can reach the destination address. It also looks for any free port.
If you want to specify the sender address in special cases, you can do this via the LocalPort property . An Android device usually only has one active network interface at a time. This is either the mobile data connection or the WiFi. Therefore a selection of the local network interface was not implemented.
Destination address
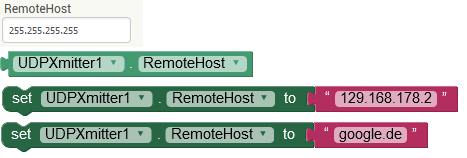
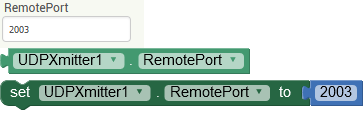
The destination address must always be specified. This is done either via the designer properties RemoteHost and RemotePort or as a parameter in the Xmit... method.
With RemoteHost either an IP address or the name of the recipient can be specified (eg "www.google.de"). The extension tries to determine the associated IP. For the designer property RemoteHost, the result of the retrieval is shown in the property RemoteIP. If the IP could not be determined, RemoteIP is empty. Sending to this host is then not possible (will lead to the UnknownRemoteHost (Code 1) error).
Since IP addresses change very rarely, the IP belonging to a host name is only determined when the name is entered. If the UnknownRemoteHost (Code 1) error occurs unexpectedly, you can try to set the RemoteHost property again. The associated IP address is then redetermined.
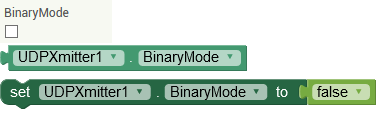
Binary mode
In the AI2 apps, messages usually consist of texts. Non-text information is converted into text:

Numbers are converted into texts.
The recipient receives the four digits "1234".

Lists
are transferred to the JSON format. The recipient receives the string [1234, "Ulli"] .
However, some receivers require certain byte sequences, for example byte 123 (Hex 7B) and not the character string "123". If binary mode is switched on, the message is interpreted as a comma-separated sequence of byte specification and the message is sent as a byte sequence (details see binary data).
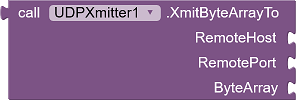
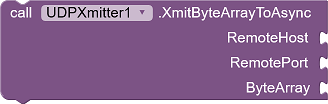
Xmit byte arrays
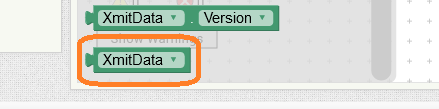
The extension UrsAI2ByteArray is required to send byte arrays. Binary sequences can be conveniently managed with it. The byte arrays are sent using the XmitByteArray ... methods, with a UrsAI2ByteArray component being specified. E.g .:

XmitData is an instance of the UrsAI2ByteArray extension. This is the last item in the block overview:
Send to a multicast group
Sending to a multicast group is not different from "normal" sending. As RemoteHost the IP address of the group must be specified.
Reference
| Block | Function | Annotation |
|---|---|---|
| Properties | ||
 |
Specifies the port number to be used to send a message. | If the value is 0 or negative, the Android operating system determines a free port. 0 is the recommended default value. The operating system then selects a free port for sending itself. Valid values are 0... 65535. This specification affects all Xmit... methods of an instance of the extension. |
 |
Defines the (default) destination address. | An IP address or the host name can be specified. This address is used by the Xmit and XmitAsync methods. |
 |
Returns the IP address that belongs to the designer property RemoteHost. | If the IP address could not be determined, an empty string is returned. Sending a datagram then fails (error UnknownRemoteHost (Code 1). |
 |
Defines the (default) destination port number. | This port is used by the Xmit and XmitAsync
methods. Valid values are 1...65535, but you should not use port numbers that are lower than 1024. Many of these numbers are reserved for special purposes. Depending on the network configuration, their use can lead to problems. |
 |
Specifies whether the message that is sent should be converted to a byte array. | Details on binary mode see binary data. |
 |
Returns the list of the IP address of all network interfaces. | Mostly this list contains only one entry that matches the entry in LocalHost. |
 |
Returns the IP address of the default network interface. | If a connection to the Internet cannot be established, an empty string is returned. Precisely, an attempt is made to reach the internet address "8.8.8.8" (Google's public DNS server). The Android operating system selects a suitable network interface for this. |
 |
Information about the last error that occurred. LastAction: Name of the method that was last executed. LastErrorCode: Error code LastErrorMessage: Short Error description. |
If no error occurred during the last action performed, LastErrorCode has the value 0 and LastErrorMessage returns an empty string. |
| Methods | ||
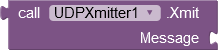 |
Sends the message to the destination address defined by RemoteHost and
RemotePort. The return value is the Error code. |
|
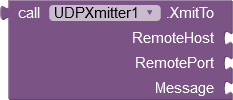 |
Sends the message to the specified destination address. The return value is the Error code. |
|
 |
Sends the message to the destination address defined by RemoteHost and
RemotePort. The success of the transfer is communicated via the AfterXmit and XmitFailure events. |
see also RemoteHost and RemoteIP. |
 |
Sends the message to the specified destination address. The success of the transfer is communicated via the AfterXmit and XmitFailure events. |
see also RemoteHost and RemoteIP. |
 |
Sends the ByteArray to the destination address
defined by RemoteHost and RemotePort. The return value is the Error code. |
|
 |
Sends the
ByteArray to the specified destination address. The return value is the Error code. |
|
 |
Sends the ByteArray to the destination address
defined by RemoteHost and RemotePort. The success of the transfer is communicated via the AfterXmit and XmitFailure events. |
see also RemoteHost and RemoteIP. |
 |
Sends the
ByteArray to the specified destination address. The success of the transfer is communicated via the AfterXmit and XmitFailure events. |
see also RemoteHost and RemoteIP. |
| Events | ||
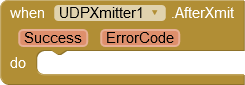 |
Reports the result of the transfer using the asynchronous methods. Success : true if the transfer was successful, false otherwise. ErrorCode: Error code. |
The event is triggered after each transmission using the XmitAsync or XmitToAsync methods . |
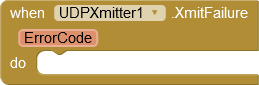 |
XmitFailure is triggered in case of a transmission error using the asynchronous
methods in addition to the AfterXmit event . ErrorCode: Error code.. |
If you are only interested in errors, there is no need to inspect Success in the AfterXmit event . |
Error Codes
| Code | Message | Meaning |
|---|---|---|
| 0 | Message successfully transmitted. | |
| 1 | Unknown Remote Host | The recipient's IP address is invalid or could not be determined. |
| 2 | Invalid Local Port | Die Angabe zu LocalPort ist ungültig oder der Port ist belegt. LocalPort is invalid or the port is in use. |
| 3 | Invalid Remote Port | RemotePort is invalid. |
| 4 | Xmit failed | Transfer failed. |
| 5 | Binary conversion failed | The specified string could not be converted to a byte array. |
| 8 | Invalid Data Type | The specified component is not of type UrsAI2ByteArray. |
Receiving Datagrams
The datagrams are received via the UDPListener component. After starting, this component checks in a continuous loop whether datagram packets have arrived. Received datagrams are published via the event DataReceived.
The UDPListener component has the two methods Start and Stop, which start and stop the listeneing to UDP datagrams. There are two events: DataReceived is triggered when a datagram has been received, ListenerFailure indicates that the receive loop was terminated due to an error. The isRunning property can be used to query at any time whether the receive loop is active.
Broadcast Messages
UDP allows Broadcast messages to be sent. In this case datagrams sent by the app itself are also received. The property DropSentToYourself is used to filter out datagrams whose sender is your own IP address.
Multiscreen Apps
Opening a second screen does not interrupt message reception! The first screen still receives the events DataReceived and ListenerFailure. The blocks associated with the events are executed when the event occurs. If this is not desired, the listener must be stopped before opening the second screen and started again after returning.
A running listener also blocks the associated port. In the second screen, no further listener can be started on this port. If datagrams are to be received on the same port as on the first screen, the listener of the first screen must be stopped before opening the second screen and opened again on the second screen.
The extension cleans up when a screen is closed, i.e. stops a running listener. Ultimately there are no running listeners left. But cleaning up is delayed in the background.
The OtherScreenClosed event therefore occurs before the listener is stopped internally and the port is released again. If you want to use the event OtherScreenClosed -what is appropriate- to restart the listener on the same port that was used in the second screen
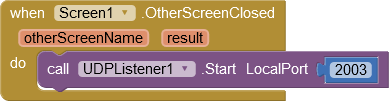
the listener in the second screen must definitely be stopped before the screen is closed.
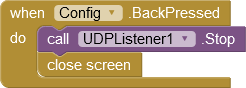
It is important
that the BackPressed event is captured on the second screen :
Binary Mode
In the AI2 apps, messages usually consist of texts. In some cases, however, the datagram consists of a sequence of any bytes (byte array). If you switch on the BinaryMmode, the received bytes are not converted directly into text. The individual bytes are presented as decimal numbers separated by semicolons.
If the listener receives a datagram with the content (hexadecimal) 48 61 6C 6C 6F, this would normally be translated into the test "Hallo". If binary mode is switched on the output is, "72; 97; 108; 108; 111" (details see binary data below).
Receiving Byte arrays
To receive byte arrays, the ReceivingByteArray property must be assigned an instance of the UrsAI2ByteArray extension. This can be done in the designer or via an instruction block.

RcvData is an instance of the UrsAI2ByteArray extension. This is the last item in the block overview:
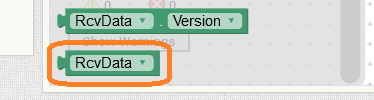
When an UDP data packet (datagram) arrives, the received data is copied into the specified UrsAI2ByteArray instance too. Then the DataReceived event is triggered. The data is only available in the UrsAI2ByteArray component as long as the code execution is in the DataReceived event. If the event method is exited, the data might be overwritten by other received packets.
Receive multicast packets
The StartMulticast method is available for receiving multicast packets. The extension will automatically join the specified multicast group.

Reference
| Block | Function | Annotation |
|---|---|---|
| Properties | ||
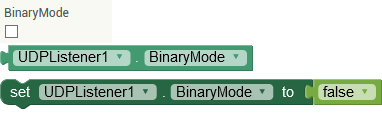 |
LSpecifies whether the received message should be interpreted as a byte array. | The received packet is translated into a string with a sequence of decimal numbers. Details on binary mode see binary data |
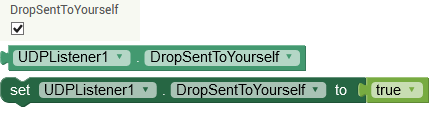 |
The DropSentToYourself property controls the behavior when receiving broadcast datagrams. By default, the block is set to ignore messages sent from your own IP. If these are still to be received, DropSentToYourself must be set to false. | The default is true. |
|
Specifies the UrsAI2ByteArray component in which the received data should be available in binary form. | The data is only available in the UrsAI2ByteArray component as long as the code execution is in the DataReceived event. If the event method is exited, the data might be overwritten by other received packets. |
 |
Removes the UrsAI2ByteArray component. | |
 |
The property isRunning can be used to query whether the listener is currently active. | |
|
Returns the list of the IP address of all network interfaces. | Mostly this list contains only one entry that matches the entry in LocalHost. |
|
Returns the IP address of the default network interface. | If a connection to the Internet cannot be established, an empty string is returned. Precisely, an attempt is made to reach the internet address "8.8.8.8" (Google's public DNS server). The Android operating system selects a suitable network interface for this. |
|
Information about the last error that occurred. LastAction: Name of the method that was last executed. LastErrorCode: Error code LastErrorMessage: Short Error description. |
If no error occurred during the last action performed, LastErrorCode has the value 0 and LastErrorMessage returns an empty string. |
| Methods | ||
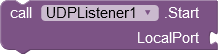 |
Start starts listening for datagrams that are sent to the specified port (UDP server). | If the start was not successful, the ListenerFailure event is triggered.
You should not use port numbers that are lower than 1024. Many of these numbers are reserved for special purposes. Depending on the network configuration, their use can lead to problems. |
|
Start starts listening for datagrams that are sent to the specified port (UDP server). | You should not use port numbers that are lower than 1024. Many of these numbers are reserved for special purposes. Depending on the network configuration, their use can lead to problems. |
 |
Stop stops the server. | Calling Stop several times is not critical and does not result in an error. |
| Events | ||
 |
The ListenerFailure event is triggered if the listener process could not
be started or was ended due to an error. ErrorCode: reason for termination. |
The reason may be, for example, the termination of a network connection. |
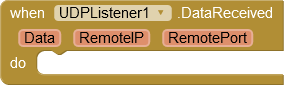 |
When a datagram is received, the DataReceived event is triggered. Data contains the datagram data. RemoteIP and RemotePort are the sender address. |
|
Fehler-Codes
| Code | Message | Meaning |
|---|---|---|
| 0 | No error. | |
| 6 | Server thread aborted | The server thread was aborted due to a (network) error. |
| 7 | Listener already running | This listener has already been started. |
| 8 | Invalid Data Type | The specified component is not of type UrsAI2ByteArray. |
Binary Data
With version 4.3, the sending and receiving of binary data has been significantly simplified via the UrsAI2ByteArray extension (see above).
Transmitting

If BinaryMode is set to true method Xmit accepts a string with coded bytes, separated by comma (‘,’) or semicolon.
Each bytes could be coded like “0xff” or “0xFF” or “0Xff” or “0XFF” or “#ff” or “#FF” for HEX input or “255” for decimal input or “0377” for octal input.
You can mix it if you want: “0xFF;255,#ff” is valid.
You can insert blanks before and after the number: “ 0xFF ; 255, #ff” is valid too.
A trailing comma or semicolon will be ignored: “0xFF;255,#ff” and “0xFF;255,#ff;” are identical.
Algorithm
This algorithm is used for the conversion:
- Replace all commas with semicolons
- Split the string using semicolons
- Delete leading and trailing spaces
- Conversion to Integer with Integer.decode()
- Check for values <0 or >255.
Receiving
If BinaryMode is set to true, the received packet is translated into a semicolon separated string of decimal numbers.
If the listener receives a datagram with the content (hexadecimal) 48 61 6C 6C 6F, this would normally be translated into the test "Hallo". If binary mode is switched on the output is, "72; 97; 108; 108; 111". You can use text.Split to get a list of bytes:

Examples
 |
 |
The blocks in the example are not difficult to understand. Most blocks concern the validation of entries.
 |
Send and receive text (URSAI2UDPTest)This example shows how text can be sent and received. |
|
|
|
The blocks in the example are not difficult to understand. Most blocks concern the validation of entries.
 |
Sending and receiving byte arrays (UDPBinaryTest)This example shows how byte arrays can be sent and received. |
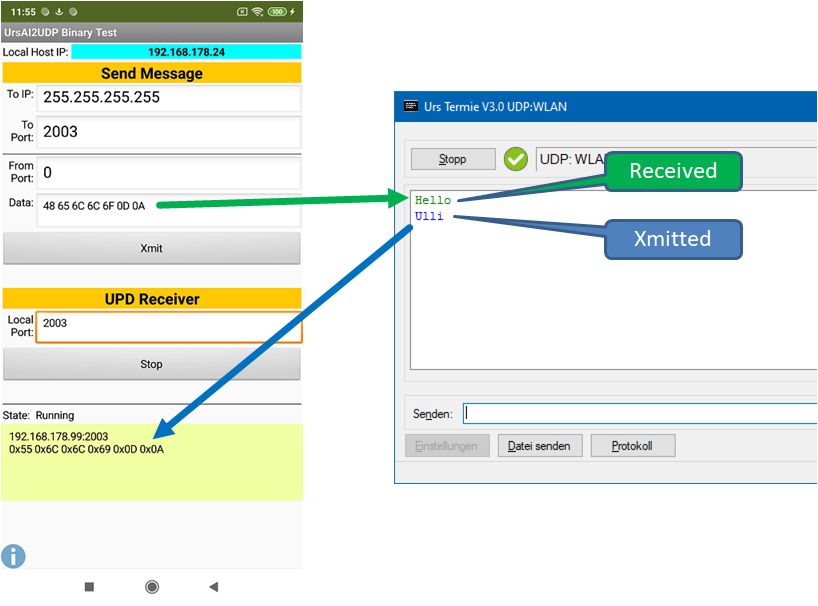
In the Data field, the bytes to be sent are specified as a sequence of two-digit
hexadecimal numbers separated by spaces (without a leading "0x"!). In the example these are the ASCII codes for
the text "Hello<CRLF>
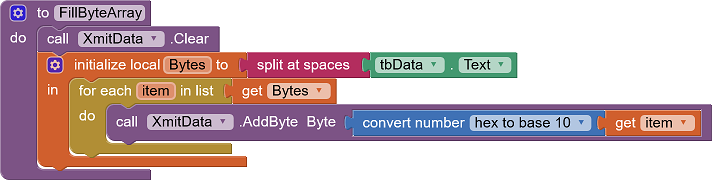
The text input is transferred to the UrsAI2ByteArray component using a procedure:
Tools
For developing own extensions I gathered some tips: AI2 FAQ: Develop Extensions.
The extensions are developed with Java. A tutorial on datagrams can be found in the Oracle Java documentation. There you will also find information about the DatagramSocket class used.